BERT는 Bidirection Encoder Representations from Transformers의 약자로 word embedding을 하기 위해 트랜스포머의 Encoder만 사용하는 것입니다.
자연어 처리에서 Word2Vec, Glove를 이용하여 단어를 표현하는데 Bert는 문장 level에서 잘 표현해 보자는 아이디어입니다.
BooksCorpus와 Wikipedia를 활용하여 사전훈련을 진행한 후, 특정 작업에 맞춰 미세 조정을 진행합니다.
BERT는 Large scale 모델로 정말 많은 Text로 학습을 시켰는데요. 그게 가능했던 이유는 데이터에 직접 라벨링을 할 필요가 없었기 때문입니다.
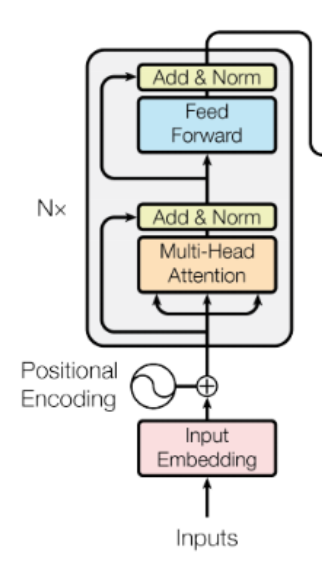
모델 구조에 대해 자세히 알아보면

Token Emeddings
Input은 두 가지 문장으로 구성되어 있고, [SEP]라는 토큰에 의해 나뉘어있습니다.
[CLS] 토큰은 앞선 Transformer에서 설명했던 문장 단위에서 분류를 하기 위해 있는 것으로 생각하시면 됩니다.
또한 그림에서 표현하는 것처럼 초기에는 Word2Vec이나 Glove를 이용하여 pretrain 된 단어의 embedding으로 구성되어 있습니다.
Position Embeddings
Transformer 파트에서 배웠던 것처럼 삼각함수의 주기성을 이용하여 Embedding 할 수 있습니다.
Segment Embeddings
Segment Embeddings에서 사용하는 토큰은 Input에서 문장이 2개가 들어가는데 이를 구분해 주기 위한 것입니다.
보시다시피 앞쪽 문장은 E_A로 표현되어 있고 뒤쪽 문장은 E_B로 표현되어 있음을 알 수 있습니다.
그럼 BERT는 어떻게 훈련하는지 알아보겠습니다.
Masked Language Modeling
Masked Language Modeling이라고 문장에 빈칸을 뚫어놓고 거기에 어떤 단어가 오면 어울리는지 맞추는 문제입니다.
아마 수능영어에서 빈칸 넣기 문제를 떠올리시면 어떤 Task인지 바로 아실 거예요.
이러한 Task는 완전한 문장에 단어를 뚫어서 데이터를 만드는 것이기 때문에 따로 정답을 labeling 할 필요가 없는 큰 장점이 있습니다.
이렇게 단어 수준의 학습을 넘어 문장 수준의 학습을 하기도 하는데요.
두 문장을 Input으로 사용하는 이유이기도 합니다.
Next Sentence Prediction
두 문장을 사용할 때 연속되는 문장을 사용하는 것을 50% 무작위로 뒷문장을 정하는 것을 50%로 하여 데이터셋을 구합니다.
앞서 모델 구조에서 봤듯이 [CLS] 토큰을 이용하여 두문장이 연속적인 문장인지 아닌지 판단합니다.
이 데이터 또한 직접 labeling 할 필요가 없어 많은 데이터를 이용하여 학습할 수 있습니다.
그럼 이제 공부한 내용을 바탕으로 BERT의 Minimalist Version을 직접 구현해 보도록 하겠습니다.
Task
SST 데이터셋과 Cfimdb 데이터셋을 이용하여 Fintune 시켜볼 텐데요.
SST데이터셋은 스탠퍼드에서 Sentiment analysis연구를 위해 만든 데이터셋으로 2가지 버전이 있습니다.
SST-1은 영화리뷰에 대해 "매우 부정적"~"매우 긍정적"까지 총 5단계로 감정 레이블을 한 데이터입니다.
SST-2는 보통 이진분류 문제에 사용되며, "부정", "긍정"의 두 레이블만 포함하고 있습니다.
Cfimdb 데이터셋은 IMDB 데이터를 정제한 것으로 영화리뷰를 '부정', '긍정'으로 레이블 한 것입니다.
BERT는 트랜스포머의 Encoder부분을 이용한 것이기 때문에 Encoder를 구현해 보도록 하겠습니다.
BERT.py
BertSelfAttention 클래스 구현하기
먼저 __init__메서드를 정의해줘야 합니다.
__init__함수에는 입력으로 들어온 벡터에 대해 Query, Key, Value로 만드는 layer와 dropout layer를 초기화합니다.
특히, 여기서 중요하게 봐야 하는 것은 Multi-Head Attention 계산을 하기 위한 부분입니다.
단어 임베딩 차원을 Attention head의 개수로 나눠 여러 개의 head가 Attention계산을 합니다.
그렇게 self.all_head_size를 출력 차원으로 설정합니다.
class BertSelfAttention(nn.Module):
    def __init__(self, config):
        super().__init__()

        self.num_attention_heads = config.num_attention_heads
        self.attention_head_size = int(config.hidden_size / config.num_attention_heads)
        self.all_head_size = self.num_attention_heads * self.attention_head_size

        # initialize the linear transformation layers for key, value, query
        self.query = nn.Linear(config.hidden_size, self.all_head_size)
        self.key = nn.Linear(config.hidden_size, self.all_head_size)
        self.value = nn.Linear(config.hidden_size, self.all_head_size)
        # this attention is applied after calculating the attention score following the original implementation of transformer
        # although it is a bit unusual, we empirically observe that it yields better performance
        self.dropout = nn.Dropout(config.attention_probs_dropout_prob)
다음으로 transform 메서드를 정의하겠습니다.
Transform 메서드는 앞서 설명한 것을 실행하는 내용으로 입력으로 들어온 벡터를 Query, Key, Value로 만들어줍니다.
이후에는 proj을 원하는 차원 배열로 변경해 주는 작업을 진행합니다.
   def transform(self, x, linear_layer):
        # the corresponding linear_layer of k, v, q are used to project the hidden_state (x)
        bs, seq_len = x.shape[:2]
        proj = linear_layer(x)
        # next, we need to produce multiple heads for the proj
        # this is done by spliting the hidden state to self.num_attention_heads, each of size self.attention_head_size
        proj = proj.view(bs, seq_len, self.num_attention_heads, self.attention_head_size)
        # by proper transpose, we have proj of [bs, num_attention_heads, seq_len, attention_head_size]
        proj = proj.transpose(1, 2)
        return proj
다음으로는 attention 메서드를 정의하겠습니다.
attention 메서드는 attention score를 구하여 value와 서로 곱해서 Attention Value를 구해주는 것을 구현하는 것입니다.
BERT는 사전 학습 시, 입력 문장의 약 15%의 단어를 무작위로 선택하여 [MASK] 토큰으로 대체합니다. [MASK] 자리에 원래 어떤 단어가 있었는지 예측하면서 단어의 의미와 문장 내에 있는 단어들의 관계를 학습합니다.
여기서 주의해야 할 점은 트랜스포머 decoder의 Masked Multi-Head attention과는 다른 목적으로 Mask를 하는 것입니다.
Attention score를 계산하기 위해 단어의 임베딩 차원수를 d_k로 설정합니다.
여기서 단어의 임베딩 차원수는 전체 차원수를 head의 개수를 나눈 것입니다.
attention_mask가 있을 경우 몹시 작은 값을 더해줘서 Softmax함수를 씌었을 때 0이 되게 합니다.
이렇게 attention score을 구해주고 value와 곱해서 각 multi-head의 output를 구합니다.
여기까지 각 multi-head에 대해 output을 구했고 이를 합쳐서 전체 Attention value를 구합니다.
seq_len과 num_heads를 transpose를 해주고 (batch_size, seq_len, num_heads * head_size) 꼴로 텐서를 재구성합니다.
이렇게 하면 각 head에서 나온 attention value를 concatenate 할 수 있습니다.
 def attention(self, key, query, value, attention_mask):
        d_k=query.size(-1)
        scores=torch.matmul(query,key.transpose(-2,-1)/math.sqrt(d_k))
        if attention_mask is not None:
            scores+=attention_mask
        attention_probs=F.softmax(scores,dim=-1)
        attention_probs = self.dropout(attention_probs)
        output= torch.matmul(attention_probs,value)

        batch_size, num_heads, seq_len, head_size = output.size()
        output = output.transpose(1, 2).contiguous().view(batch_size, seq_len, num_heads * head_size)

        return output
마지막으로 forward 메서드는 앞서 구현한 메서드를 통해 정의할 수 있습니다.
def forward(self, hidden_states, attention_mask):
        """
        hidden_states: [bs, seq_len, hidden_state]
        attention_mask: [bs, 1, 1, seq_len]
        output: [bs, seq_len, hidden_state]
        """
        query=self.transform(hidden_states,self.query)
        key=self.transform(hidden_states,self.key)
        value=self.transform(hidden_states,self.value)
        output=self.attention(key,query, value, attention_mask)

        return output
BertLayer 클래스 구현하기
이 부분을 구현한다고 생각하시면 됩니다.
먼저 동일하게 __init__메서드부터 정의하겠습니다.
크게 3 부분으로 나눌 수 있는데 attention을 한 후 residual connection과 normalization을 하는 block, feedworad layer, 마지막 출력에서 residual connection과 normalization을 하는 block으로 나눌 수 있습니다.
따라서 __init__메서드에서는 dense_layer, norm_layer, dropout_layer를 초기화하고 활성화 함수를 초기화했습니다.
여기서 self.attention_dense, self.out_dense을 설정해 주는 이유는 원래의 차원으로 변환하여 residual connection과 layer normalization은 원활하게 하기 위함입니다.
class BertLayer(nn.Module):
    def __init__(self, config):
        super().__init__()
        # self attention
        self.self_attention = BertSelfAttention(config)
        self.attention_dense = nn.Linear(config.hidden_size, config.hidden_size)
        self.attention_layer_norm = nn.LayerNorm(config.hidden_size, eps=config.layer_norm_eps)
        self.attention_dropout = nn.Dropout(config.hidden_dropout_prob)
        # feed forward
        self.interm_dense = nn.Linear(config.hidden_size, config.intermediate_size)
        self.interm_af = F.gelu
        # layer out
        self.out_dense = nn.Linear(config.intermediate_size, config.hidden_size)
        self.out_layer_norm = nn.LayerNorm(config.hidden_size, eps=config.layer_norm_eps)
        self.out_dropout = nn.Dropout(config.hidden_dropout_prob)
add_norm 메서드에서는 /(LayerNorm(x + Sublayer(x))/)을 구현해야 합니다.
여기서 output은 attention layer 또는 feedfoward layer를 통과한 값으로 dense_layer를 통해 원래 차원으로 변경해줘야 합니다.
이후 overfitting을 방지하기 위해 dropout layer를 통과시킵니다.
마지막으로 아무 layer도 통과시키지 않은 input을 output과 더해(residual connection) layer_norm을 통과시킵니다.
 def add_norm(self, input, output, dense_layer, dropout, ln_layer):
        sublayer_output=dense_layer(output)
        sublayer_output=dropout(sublayer_output)
        final_norm= ln_layer(input+sublayer_output)
        return final_norm
마지막으로 forward 메서드에서는 앞서 정의한 메서드를 이용하여 다음과 같이 구현합니다.
    def forward(self, hidden_states, attention_mask):
        attention_output=self.self_attention(hidden_states, attention_mask)
        add_norm_attention_output=self.add_norm(
            hidden_states,
            attention_output,
            self.attention_dense,
            self.attention_dropout,
            self.attention_layer_norm
            )
        feed_forward_layer = self.interm_af(self.interm_dense(add_norm_attention_output))
        fc_output=self.add_norm(
            add_norm_attention_output,
            feed_forward_layer,
            self.out_dense,
            self.out_dropout,
            self.out_layer_norm
            )
        return fc_output
BertModel 클래스 구현하기
크게 embed과정과 encode과정을 수행합니다.
미리 pretrain 되어있는 BertpreTrainedModel을 상속받습니다.
__init__메서드에서는 ebedding(3가지), encoder, [CLS] 토큰에 대해 초기화합니다.
word 자체를 임베딩해주고 트랜스포머는 RNN과 다르게 위치에 대한 정보가 없으므로 위치 정보 임베딩도 더해줍니다.
또한 BERT는 두 개의 문장을 입력으로 사용하는데 각각을 구분할 수 있게 임베딩합니다.
BERT encode 부분은 bert layer를 쌓아서 bert encoder를 만듭니다.
마지막으로 문장을 분류할 수 있도록 넣어준 [CLS] 토큰에 대해서도 정의를 합니다.
class BertModel(BertPreTrainedModel):
    def __init__(self, config):
        super().__init__(config)
        self.config = config
        # embedding
        self.word_embedding = nn.Embedding(config.vocab_size, config.hidden_size, padding_idx=config.pad_token_id)
        self.pos_embedding = nn.Embedding(config.max_position_embeddings, config.hidden_size)
        self.tk_type_embedding = nn.Embedding(config.type_vocab_size, config.hidden_size)
        self.embed_layer_norm = nn.LayerNorm(config.hidden_size, eps=config.layer_norm_eps)
        self.embed_dropout = nn.Dropout(config.hidden_dropout_prob)
        # position_ids (1, len position emb) is a constant, register to buffer
        position_ids = torch.arange(config.max_position_embeddings).unsqueeze(0)
        self.register_buffer('position_ids', position_ids)
        # bert encoder
        self.bert_layers = nn.ModuleList([BertLayer(config) for _ in range(config.num_hidden_layers)])
        # for [CLS] token
        self.pooler_dense = nn.Linear(config.hidden_size, config.hidden_size)
        self.pooler_af = nn.Tanh()
        self.init_weights()
embed 메서드를 정의할 건데 여기서는 토큰 임베딩, 위치 임베딩, 문장의 종류 임베딩에 대해 element-wise 덧셈을 합니다.
이후 학습의 안정성과 과적합을 방지하기 위해 layer normalization과 dropout을 진행합니다.
def embed(self, input_ids):
        input_shape = input_ids.size()
        seq_length = input_shape[1]
        # get word embedding from self.word_embedding
        inputs_embeds = self.word_embedding(input_ids)
        # get position index and position embedding from self.pos_embedding
        pos_ids = self.position_ids[:, :seq_length]
        pos_embeds = self.pos_embedding(pos_ids)
        # get token type ids, since we are not consider token type, just a placeholder
        tk_type_ids = torch.zeros(input_shape, dtype=torch.long, device=input_ids.device)
        tk_type_embeds = self.tk_type_embedding(tk_type_ids)
        # add three embeddings together
        embeds = inputs_embeds + tk_type_embeds + pos_embeds
        # layer norm and dropout
        embeds = self.embed_layer_norm(embeds)
        embeds = self.embed_dropout(embeds)
        return embeds
encode메서드에서는 self.bert_layers에 있는 각 BERT 레이어에 hidden_states와 extended_attention_mask를 입력으로 전달하며, 레이어별로 출력을 업데이트합니다.
def encode(self, hidden_states, attention_mask):
        extended_attention_mask: torch.Tensor = get_extended_attention_mask(attention_mask, self.dtype)
        # pass the hidden states through the encoder layers
        for i, layer_module in enumerate(self.bert_layers):
            # feed the encoding from the last bert_layer to the next
            hidden_states = layer_module(hidden_states, extended_attention_mask)

        return hidden_states
forward 메서드는 앞서 정의한 메서드들을 이용합니다.
임베딩하여 bert layer에 통과시킵니다.
그리고 맨 앞 [CLS] 토큰을 받아 문장을 분류할 수 있도록 합니다.
def forward(self, input_ids, attention_mask):
        # get the embedding for each input token
        embedding_output = self.embed(input_ids=input_ids)
        # feed to a transformer (a stack of BertLayers)
        sequence_output = self.encode(embedding_output, attention_mask=attention_mask)
        # get cls token hidden state
        first_tk = sequence_output[:, 0]
        first_tk = self.pooler_dense(first_tk)
        first_tk = self.pooler_af(first_tk)
        return {'last_hidden_state': sequence_output, 'pooler_output': first_tk}
이처럼 Wikipedia와 BookCorpus 같은 대규모 코퍼스를 활용하여 pretrain 된 BERT에 SST데이터셋과 Cfimdb데이터셋에 대해 finetune 합니다.
학습을 진행한 결과는 다음과 같습니다.
SST 데이터셋에 대한 학습

CFimdb 데이터셋에 대한 학습

'Machine learning & Deep learning' 카테고리의 다른 글
| [Machine learning]Energy-based Models(part1) (0) | 2025.02.27 |
|---|---|
| [Deep learning] Metric learning 개념 정리 (0) | 2025.02.26 |
| [Deep learning] Transformer 자세히 공부한 것.. (0) | 2025.02.18 |
| [Deep learning] Transformer에 대한 기본 아이디어 (0) | 2025.02.17 |
| [Deep learning] Attention Mechanism에 대하여 (0) | 2025.02.16 |