My First C++ Program
#include <iostream>
int main(void) {
std::cout << "Hello C++!" << std::endl;
return 0;
}
C++ 소스 코드 파일을 하기 실행 가능한 파일로 변환하기 위해 다음과 같이 적는다.
$ g++ helloC++.cpp –o helloC++ -std=c++20이 명령어를 분석해 보면
- g++: C++컴파일러를 실행한다.
- helloC++. cpp -o helloC++: helloC++. cpp 소스코드를 helloC++로 출력파일을 지정한다.
- -std=c++20: C++20 표준을 사용하여 컴파일한다.
#include <stdio.h>

int main(void)
{
    printf("Hello C!\n");
    return 0;
}
C++소스코드와 동일한 기능을 하는 C코드이다.
둘을 비교해 보면
- header file: stdio.h vs iostream
iostream의 가장 큰 특징은 stream 기반 입출력을 사용한다는 점이다.
스트림은 데이터를 연속적으로 흘려보내는 개념으로 입출력을 효율적으로 관리할 수 있다.
여기서는 printf 대신 std::cout을 사용한 게 function 기반 입출력을 사용하지 않고 stream기반 입출력을 사용한 예이다.
이 부분은 뒤에서 더 자세하게 살펴보겠다.
또한 type conversion을 자동으로 처리하고 namespace를 이용하여 모듈화 된 접근방식을 제공한다.
- Newline: '\n' vs std::endl
줄 바꿈도 위와 같이 달라졌다.
What is the Namespaces?
C++의 전역변수, 함수, 클래스, 구조체 등이 하나의 프로그램에서 공유될 때, 프로그램이 커지고 다양한 라이브러리를 포함하면 Name conflict가 발생한다.
이때, Namespaces는 Name conflict를 방지하기 위해 각각을 특정 scope안에 encapsulate 해 독립적으로 관리하는 것이다.
#include <iostream>

// 첫 번째 라이브러리
void printMessage() {
    std::cout << "Hello from Library 1" << std::endl;
}

// 두 번째 라이브러리
void printMessage() {  // ❌ 이름이 충돌 발생!
    std::cout << "Hello from Library 2" << std::endl;
}

int main() {
    printMessage();  // 어떤 함수를 호출해야 할까?
    return 0;
}
이럴 경우 main function에서 printMessage메서드를 이용하려 할 때 어떤 것을 이용해야 할지 conflict가 생길 수 있다.
#include <iostream>

// 첫 번째 라이브러리
namespace Library1 {
    void printMessage() {
        std::cout << "Hello from Library 1" << std::endl;
    }
}

// 두 번째 라이브러리
namespace Library2 {
    void printMessage() {
        std::cout << "Hello from Library 2" << std::endl;
    }
}

int main() {
    Library1::printMessage();  // 명확하게 라이브러리 1의 함수 호출
    Library2::printMessage();  // 명확하게 라이브러리 2의 함수 호출
    return 0;
}
위처럼 Library1, Library2로 namespace를 지정하면 동일한 이름의 메서드라도 구분가능하다.
Namespace의 주요 특징에 대해 살펴보면
- C++ Standard Library 모두 std namespace안에 포함된다. 따라서 기본적인 I/O operation이나 알고리즘, 데이터 구조 모두 std를 붙이고 사용해야 한다.
- Scope resolution operator ::을 사용하여 각각의 namespace를 구체화한다.
- Namespace 내부에서는 namespace name:: 이렇게 지정할 필요 없이 그냥 사용해도 된다. 반면에 외부에서 사용하면 무조건 name space를 붙여야 한다. 아래 예시를 보면 myNamespace 안에서는 a, b를 namespace 지정 없이 사용했고 main() 안(namespace 밖)에서 사용할 때는 myNamespace을 a, b, setValues 앞에 붙였다.
namespace myNamespace {
int a, b;
void setValues(int newValueA, int newValueB) {
a = newValueA;
b = newValueB;
}}
int main() {
myNamespace::a = 5;
myNamespace::b = 3;
myNamespace::setValues(10, 20);
}- 여러 코드에 걸쳐 동일한 이름의 namespace를 사용해도 문제가 안된다. 오히려 좋다. 또한 이렇게 같은 이름의 namespace를 이용하는 것은 같은 scope안에 encapsule 되어있다고 생각하면 된다.
#include <iostream>

// 첫 번째 정의
namespace MyNamespace {
    int value = 10;
}

// 두 번째 정의 (새로운 기능 추가)
namespace MyNamespace {
    void show() {
        std::cout << "Value: " << value << std::endl;
    }
}

int main() {
    MyNamespace::show(); // "Value: 10" 출력
    return 0;
}- using을 사용하면 현재 실행되고 있는 region에서 변수나 함수를 namespace를 생략하고 쓸 수 있다.
#include <iostream>

namespace first {
    int x = 5;
}

namespace second {
    double x = 3.1416;
}

int main() {
    using first::x;  // first 네임스페이스의 x를 현재 범위로 불러옴
    std::cout << x << std::endl;   // first::x 사용
    std::cout << second::x << std::endl; // second::x는 여전히 네임스페이스 필요
    return 0;
}
여기서 보면 main()에서 using을 이용하여 first namespace를 선언했기 때문에 5에 해당하는 x는 앞에 first라고 붙일 필요가 없고 3.14 16에 해당하는 x는 앞에 second라고 붙여서 사용해야 한다.
- 다음과 같이 numspace 전부를 using 할 수 있다. 하지만 이는 충돌 가능성이 높아져 안 좋은 방법이다.
#include <iostream>
using namespace std; // 위험!

namespace first {
    int x = 5;
}

namespace second {
    double x = 3.1416;
}

int main() {
    cout << first::x << endl;
    cout << second::x << endl;
    return 0;
}- Namespace에 대해 별칭(aliasing)을 쓸 수 있다.
#include <iostream>

namespace first {
    int x = 5;
}

int main() {
    namespace alias = first; // 별칭 설정
    std::cout << alias::x << std::endl;
    return 0;
}- C++ Standard library의 요소는 웬만하면 Using을 사용하지 않고 explicit 하게 std::를 붙여서 사용한다.
- 여기서 header file과 비슷하다가 생각할 수 있는데 둘은 다르다. header file은 코드를 재사용하고 효율성을 높이려고 이용하는 반면 namespace는 name conflict를 피하기 위해서이다.
I/O Streams
C++ Standard Library의 일부로 input과 output 작업을 관리한다.
Cin

Cin은 C++ Standard Library의 istream 클래스 객체로 키보드에서 입력을 받아 변수에 저장한다. C에서 scanf 역할을 한다고 생각하면 된다.
위 그림을 보면 수도관(Cin)을 틀면(>> 연산자 적용) 물(데이터)이 변수를 채우는 것이다.
Cin의 주요한 특징에 대해 알아보면
- 포맷을 따로 지정할 필요 없이 자동으로 type conversion이 일어난다.
#include <iostream>
using namespace std;

int main() {
    int age;
    double salary;
    char grade;

    cin >> age;
    cin >> salary;
    cin >> grade;

    cout << "Age: " << age << endl;
    cout << "Salary: " << salary << endl;
    cout << "Grade: " << grade << endl;
}
이 예시 코드를 보면 cin으로 입력받아 age, salary, grade 변수에 각각 int, double, char로 type inversion 하여 저장한다.
- 사용자가 입력한 데이터는 먼저 input buffer에 저장한다. 이후 여기서 >> operation을 통해 변수에 저장하는 것이다.
- 입력 데이터의 타입에 따라 input buffer에서 얼마나 읽어야 하는지 달라진다.
- char: 하나의 char만 읽어온다.
- int: non-numeric 한 character가 나올 때까지 읽는다.
- string: 공백(white space, newline)이 있을 때까지 읽는다.
#include <iostream>
using namespace std;

int main() {
    int age;
    double salary;
    char grade;

    cin >> age >> salary >> grade;  // 연속 입력

    cout << "Age: " << age << endl;
    cout << "Salary: " << salary << endl;
    cout << "Grade: " << grade << endl;
}
위 코드에 대해 다음과 같은 상황을 살펴보면(순서대로 보겠다)
- int인 age가 20까지 받고 newline인 non-numeric character을 만났으므로 멈춘다. double인 salary 또한 1.5까지 받고 newline를 만났으므로 멈춘다. 마지막으로 char인 grade는 한 개의 character을 저장한다.
- int인 age가 20까지 받고 whitespace인 non-numeric character을 만났으므로 멈춘다. double인 salary 또한 1.5까지 받고 whitespace를 만났으므로 멈춘다. 마지막으로 char인 grade는 한 개의 character을 저장한다.
- int인 age가 20까지 받고 string(a)인 non-numeric character을 만났으므로 멈춘다. 다음 double인 salary에 string인 a가 들어가면서 오류가 발생한다. 이 경우 cin의 상태가 fail이 되고 더 이상 입력을 받을 수 없다.
마지막 경우(오류가 발생한 경우에 대해 더 자세하게 살펴보겠다.
- cin.clear(), cin.ignore()
int main() {
    int number;
    cout << "Enter a number: ";

    if (!(cin >> number)) {  // 입력 실패 시 실행
        cout << "That was not a number!" << endl;
        cin.clear();  // 에러 상태 제거
        cin.ignore(numeric_limits<streamsize>::max(), '\n');  // 남은 입력 무시
    }

    return 0;
}
fail 상태가 되면 더 이상 입력을 받을 수 없다. 따라서 cin.clear()를 이용하여 error state을 초기화하고 cin.ignore()을 이용하여 남은 버퍼에 있는 데이터를 무시한다.
- cin은 자기 자신을(itself) 반환하기 때문에 input에 대해 chaining을 적용할 수 있다.
cin >> age >> salary >> grade;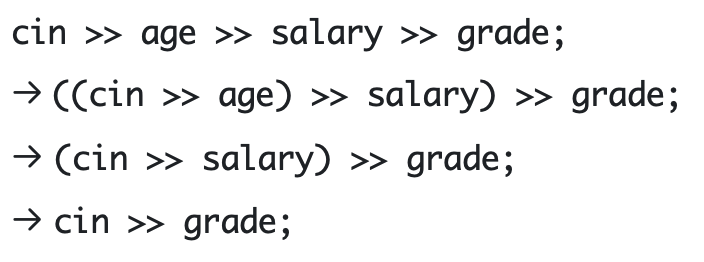
- cin은 getline을 통해 문장 전체를 받아 온다. 특히 getline을 통해서는 공백을 받아 올 수 있다.
#include <iostream>
#include <string>

int main() {
    std::string myStr;
    std::getline(std::cin, myStr);
    std::cout << myStr;
    return 0;
}
여기서 문자열을 저장할 변수를 다음과 같이 선언한다.
std::string myStr;원래는 char []이런 식으로 선언했다면 여기서는 C++ Standard Library의 string class를 이용한 것이다.
char과 주요한 차이로는 메모리 크기를 동적으로 조절할 수 있고 문자열 조작을 간편하게 할 수 있다.
이후 getline()을 통해 문장 전체를 받아온다. getline()을 이용하면 변수에 공백도 저장할 수 있다.
Cout

Cout은 C++ Standard Library의 부분으로 iostream을 통해 이용가능하다.
console에 데이터를 출력하는 데 사용된다.
위 그림을 살펴보면 output buffer에 있는 임시 데이터를 cout을 통해 standard output device에 써주는 것이다.
주요한 특징에 대해 알아보자.
다음과 같이 buffer를 이용하는 이유는 데이터를 입력받자마자 출력하면 비효율적이기 때문에 일정량이 쌓이면 한 번에 출력하는 것이다.
- cin과 마찬가지로 type conversion이 필요 없다. 알아서 써준다.
- 변수의 주소, 문자열도 출력할 수 있다.
- std::endl은 개행뿐만 아니라 buffer flushing작업도 한다. 따라서 즉시 출력할 경우 사용하고 주로 cin과 같이 사용한다.
- std::cout의 출력 형식을 지정하기 위해 setprecision()과 fixed를 이용한다.
#include <iostream>
#include <iomanip>  // setprecision을 사용하려면 필요
using namespace std;

int main() {
    double pi = 3.14159265;
    cout << "Pi (default): " << pi << endl;
    cout << "Pi (2 decimal places): " << setprecision(2) << pi << endl;
    cout << "Pi (fixed 2 decimal places): " << setprecision(2) << fixed << pi << endl;
    return 0;
}
다음과 같이 setprecision(2)로 하면 전체 자릿수를 2개로 정한다는 것이다.
fixed로 하면 소수점 둘째 자리까지 유지하는 것이다.
둘 다 반올림해줘야 한다.
- setfill()과 setw()을 통해 어떤 것을 얼마만큼 채워서 출력할지 정할 수 있다.
#include <iostream>
#include <iomanip>
using namespace std;

int main() {
    int number = 5;
    cout << setw(8) << number << endl;          // 기본 정렬
    cout << setfill('0') << setw(8) << number << endl;  // 앞에 0을 채움
    return 0;
}
setw()을 통해 정렬을 해준다. 즉 칸이 몇 개 인지 정해주고 setfill을 통해 원래 변수 앞에 어떤 것을 채울지 결정한다.
- 오류 메시지를 출력하는 두 가지 stream에 대해 알아보겠다.
- std::cerr은 std::cout과 다르게 buffer 돼있지 않다. 즉시 출력된다.
- std::clog는 std::cerr과 다르게 buffer 돼있다. 즉 flush를 최적화하여하기 때문에 좀 더 효율적이다.
'Computing' 카테고리의 다른 글
| [C++] C++ Standard Library part2. File I/O streams / Strings / Containers (2) | 2025.03.19 |
|---|---|
| [빅데이터 및 지식관리시스템] View에 대해 알아보기 (1) | 2025.03.18 |
| [C] Memory model(Stack vs Heap) (0) | 2025.03.17 |
| [빅데이터 및 지식관리시스템] Relational Data Model/Database 알아보기 (0) | 2025.03.15 |
| [빅데이터 및 지식관리시스템] DBMS와 level of abstraction에 대해 알아보기 (1) | 2025.03.14 |